Web Development
Lesson 1: An Introduction
1. What Can We Build?

In this course, you'll learn the basics of:
HTML: The language we use to create the content of websites.
CSS: The language we use to style & design websites.
JavaScript: The language that makes websites dynamic and interactive.
Years ago, it would have taken many different software programs to accomplish what we can now achieve on the web right through our browsers. For whatever you want to create, from websites, to games, to specialized software, there's a good chance that these web technologies will be an essential part.
Having a clear vision of what you want to build can make learning a lot easier. So, before you dive into the lesson, think about some of the things you'd like to create with your soon-to-be learned skills.
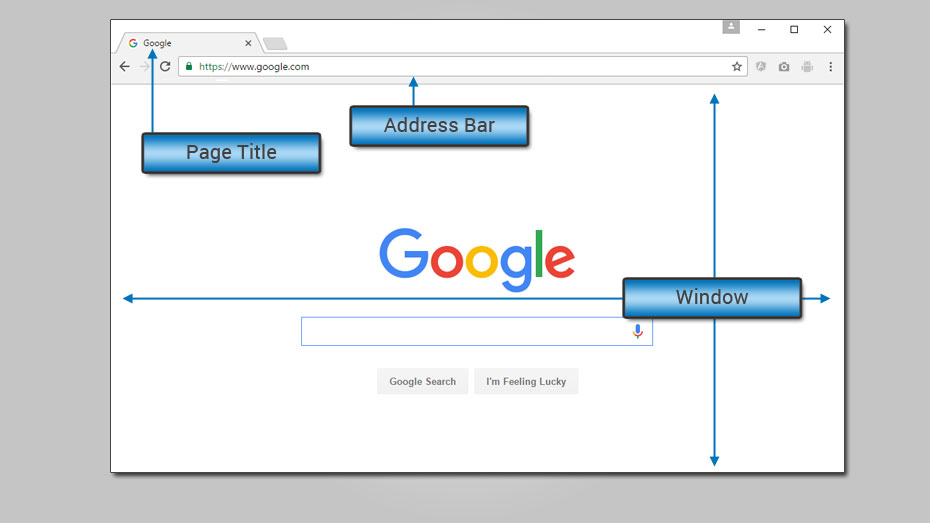
2. The Browser
In order to view websites, we use computer applications called Browsers. Popular browsers include: Google Chrome, Internet Explorer & Edge, Mozilla Firefox, and Safari.
Browsers read the Web Address, or URL, in their Address Bar.
Browsers can then load the files needed to produce the webpage in the Browser Window.
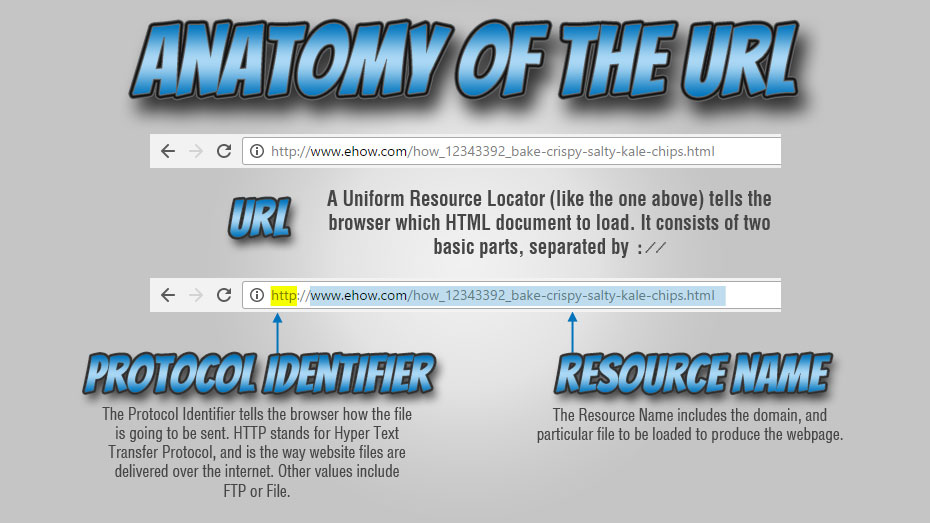
3. URLs, Clients, and Servers
In order to show web pages, we have to tell our browser where to find the website's files. The Address Bar of the Browser contains the Web Address, or URL of the page we're currently looking at. Using the URL, the browser locates these files in a process somewhat similar to how you would find a computer file. First, you've got to make sure you're looking on the right computer, then you've got to make sure you're looking in exactly the right folder to find the file you need.
The URL has two main components:
The
Protocol Identifier: For the URL http://www.example.com/page.html, the protocol
identifier is http.
Resource
Name: For the URL http://www.example.com/page.html, the resource name is www.example.com/page.html
Basically, the Resource Name part of the URL tells the browser exactly which computer (i.e., Server) holds the file, and in exactly which folder it can be found.
The Resource Name can also be broken down into several components:
Subdomain:
For the URL http://www.example.com/page.html, the Subdomain is www.
Domain:
For the URL http://www.example.com/page.html, the Domain is example. Each
domain on the internet must be unique, and you can purchase and manage domain names through companies
called Domain
Name Registrars.
Top-Level
Domain: For the URL http://www.example.com/page.html, the Top-Level Domain is
com. Top-Level Domains are another way to categorize web content. They often give web
users clues about the type of content they're viewing e.g., .com for businesses, .org
for non-profits, and .edu for schools.
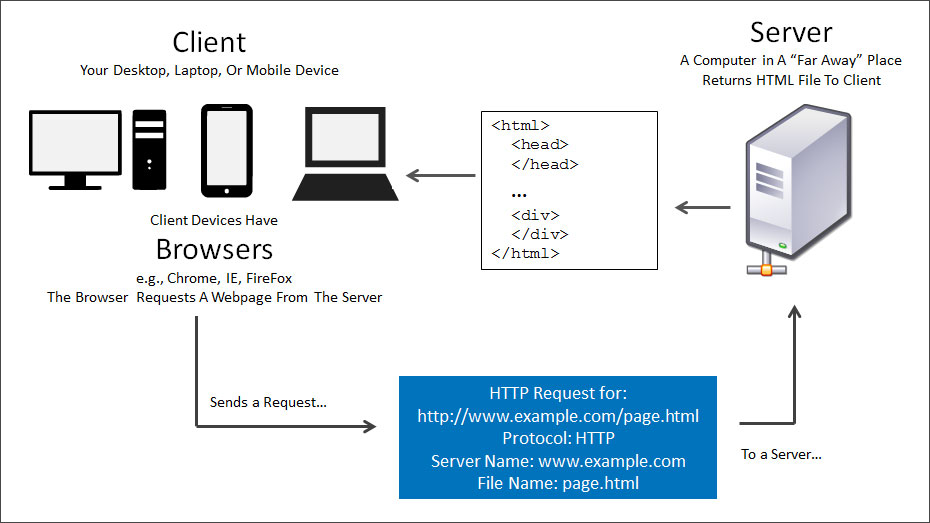
The files used to create websites for the internet live on "far-away" computers, called Servers. The computer on which we're viewing the website is called a Client. The image below shows how a Browser on a Client machine contacts a Server, and receives back the file(s) needed to create a web page.
While most website files are accessed over the internet, it's important to realize that our browser doesn't need an internet connection to compile and create web pages.
The browser can open and compile any file on our computer with an .html extension the
same way it would a file served to us over the internet.
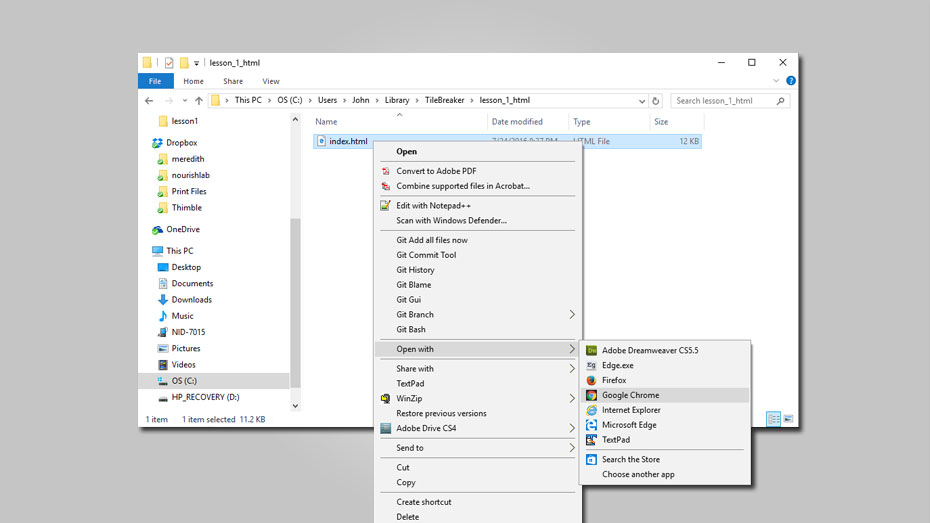
In this course, we'll be viewing the web pages we create using the Google Chrome browser (as
developers, it gives us some nice features). Note: To open an .html file in Google
Chrome, just Right Click on it and select Open with > Google Chrome as
shown below (double clicking on the file would likely cause it to open in Internet Explorer, instead).
Quiz # 1 - URLs
An .html file opened "locally" in a browser (i.e., the file lives on the same computer
as the browser and isn't coming over the internet) could have a URL that looks something like this:
file:///C:/Users/John/Library/TileBreaker/lesson_1_html/index.html
What is the Protocol Identifier for this URL?
4. Setting Up The File Structure
Websites are structured just like other groups of files on your computer. Files of different types are placed in folders, and by setting up our file structure now, it will make it easier to manage all of our images, as well as HTML, CSS, and JavaScript files.
First off, a definition: the top-level folder that stores website files is called the site's root.
When we're developing locally on a computer, the full path to our site's root will include the location
of the root folder on the computer we're using, something like: file:///C:/Users/John/Desktop/MyWebsite/index.html.
When we secure our own domain name, and launch our site's files to a webhost's server computer, the root
of our site will be on the server computer an will be our domain name (with the top-level and sub-domain
added.) For example, if we secured a domain called www.MyWebsite.com, we would see a folder
with this name when we accessed the server computer. We would place our website's files there.
By convention, the file for the homepage of our website is usually called index.html. The
webserver will look for this file when users access our homepage e.g., www.MyWebsite.com in
a browser.
HTML documents are created with Text Editors - programs which allow us to create and edit
plain text. Text editors are a little bit different than word processing programs because the output
they produce is usually computer code meant to be read by machines. Text editors include Notepad (on
Windows), TextEdit (on Mac), and the text editor we'll be using, Sublime Text.
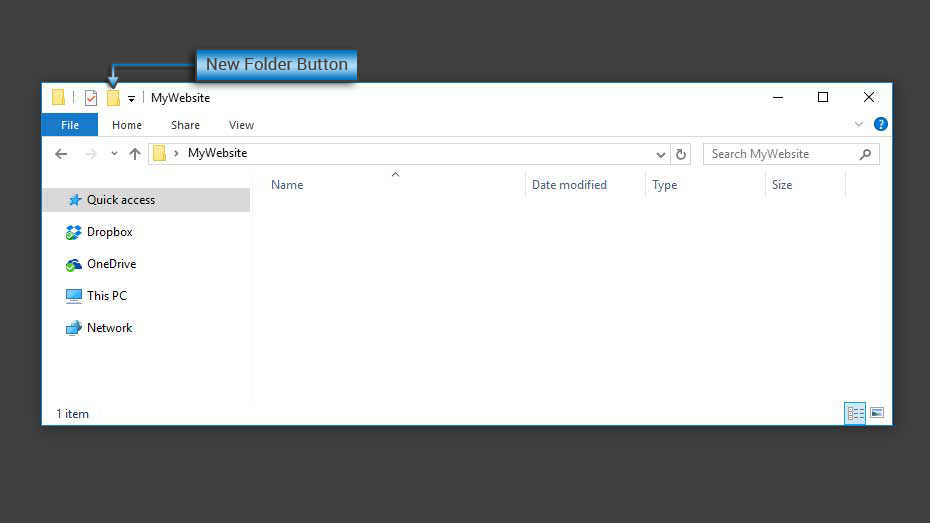
ACTION STEP 1: Create A Root Folder For Your Website
Using the Windows File Explorer, open a folder where you want to place your site root. Click the
New Folder Button and give your root folder a name (without spaces). For this tutorial,
we used the name: MyWebsite
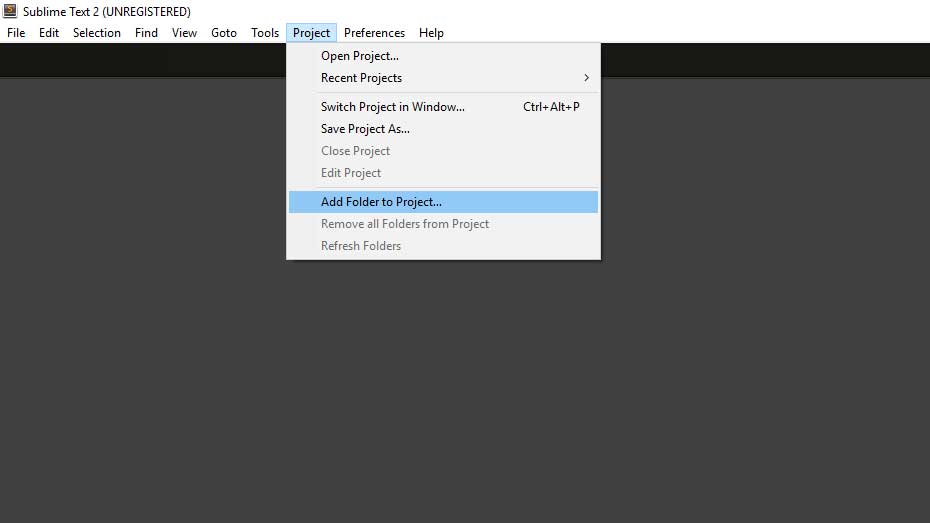
ACTION STEP 2: Add The Root Folder To Sublime Text
In Sublime Text, Click Project > Add Folder To Project.... Navigate to the root folder you just created and click Open.
ACTION STEP 3: Add The index.html File
With the project now open in SublimeText, Right Click on the Root Folder in the left panel
and select New File. Name it: index.html.
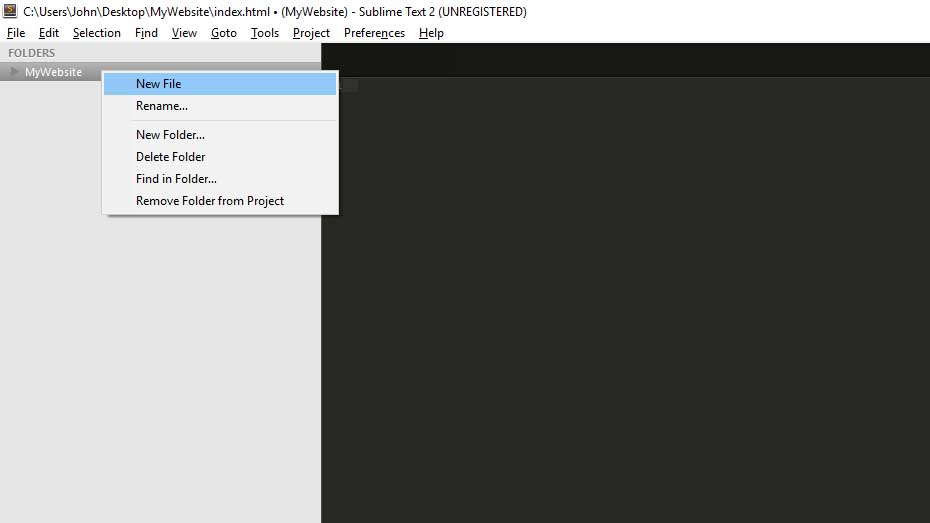
index.html fileACTION STEP 4: Add an assets Folder to the Root Folder
Right Click on the Root Folder and select New Folder... Then name the new
folder: assets.
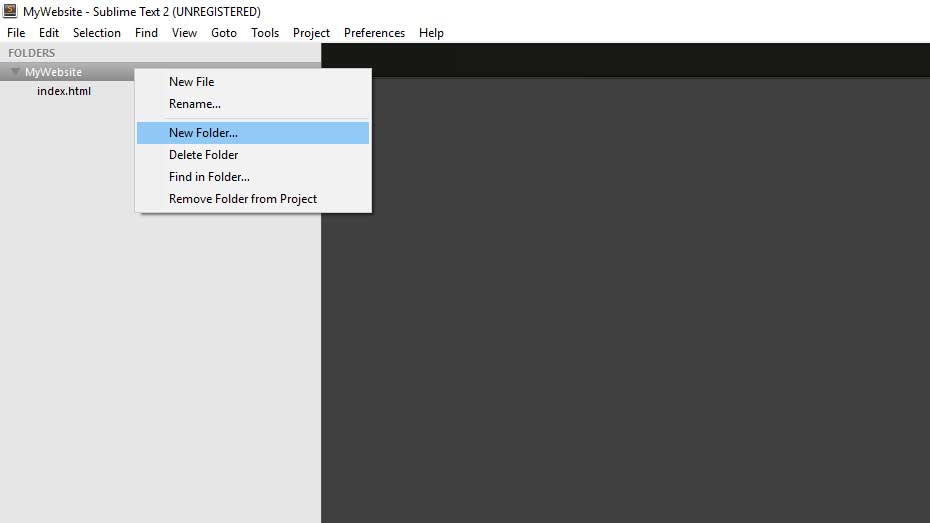
assets folder to the root folderACTION STEP 5: Add css, js, and img Folders to
the asset Folder
Now, add three folders to the assets folder by Right Clicking on the assets
folder and selecting New Folder... for each. Name the folders: css,
js, andimg
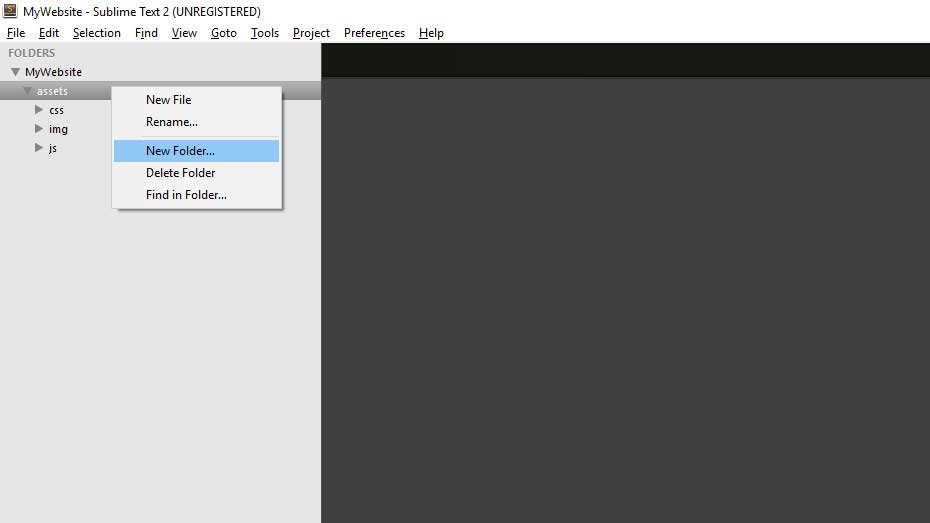
css, js, and img folders
to the asset folder
ACTION STEP 6: Add themain.css and main.js files
Right Click on the css folder and select New File. Name it:
main.css
Right Clickon the js folder and select New File. Name it: main.js
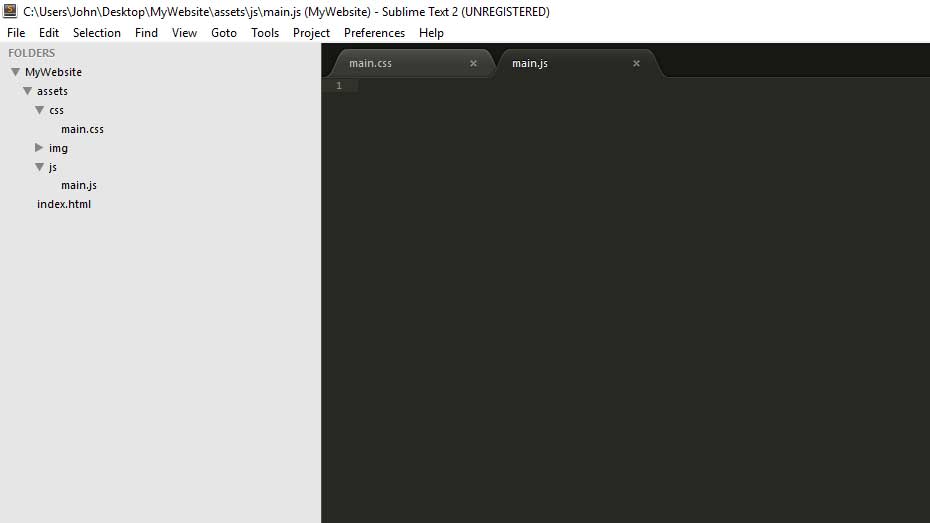
main.css and main.js files
Our file structure is now set up so we have convenient places to put our images, stylesheets, and javascript files.
5. HTML
Websites are created with a scripting language called HTML (HyperText Markup Language).
HTML files end with .html and contain certain Tags
telling the browser what to do.
We use tags to create Elements, or, parts of our web page. HTML allows us to create many elements such as paragraphs, lists, tables, divisions, and headers,
ACTION STEP 7: Copy and paste the html code below into the index.html
file you just created:
File: index.html
<!DOCTYPE html>
<html>
<head>
<title>This is document title</title>
</head>
<body>
<h1>This is an <h1> heading</h1>
<h2>This is an <h2> heading</h2>
<h3>This is an <h3> heading</h3>
<h4>This is an <h4> heading</h4>
<p>This is paragraph text inside a <p> tag</p>
<!-- We use this syntax to write comments -->
<ul>
<li>Unordered List Item #1</li>
<li>Unordered List Item #2</li>
<li>Unordered List Item #3</li>
</ul>
<ol>
<li>Ordered List Item #1</li>
<li>Ordered List Item #2</li>
<li>Ordered List Item #3</li>
</ol>
</body>
</html>
We can recognize (and create) Tags
when we see certain words in brackets like this: < >
HTML tags normally come in pairs like <p> and </p>
The first tag in a pair is the Start Tag, the second tag is the End Tag
The end tag is written like the start tag, but with a forward slash: / inserted
before the tag name
Some Common Tags:
- The text between
<html>and</html>describes the entire HTML document. - The text between
<head>and</head>provides information about the document to the browser. - The text between
<title>and</title>provides a title for the document (The title tag is in the document<head>, and the rendered title is visible in the browser tab). - The text between
<body>and</body>describes the visible page content. - The text between
<h1>and</h1>describes a heading (<h2>,<h3>, and<h4>tags are also headings - each a little smaller than the last.) - The text between
<p>and</p>describes a paragraph.
Notice in the above code that tags are indented when they are placed inside other tags. HTML ignores tabs, indents, and multiple spaces, so indenting won't affect the way the page renders - it can just make it easier for humans to recognize the structure of the document. When tags are placed inside other tags, the elements they produce are known as children, and the element (or elements) that contain them are called parents.
In the above code, the <html> element is a parent of both the
<head> and <body> elements (the <html>
element is also known as the root element because everything is inside of it). The
<body> and the <head> elements aren't inside one another (notice
that they are indented the same amount). For this reason, they are called siblings.
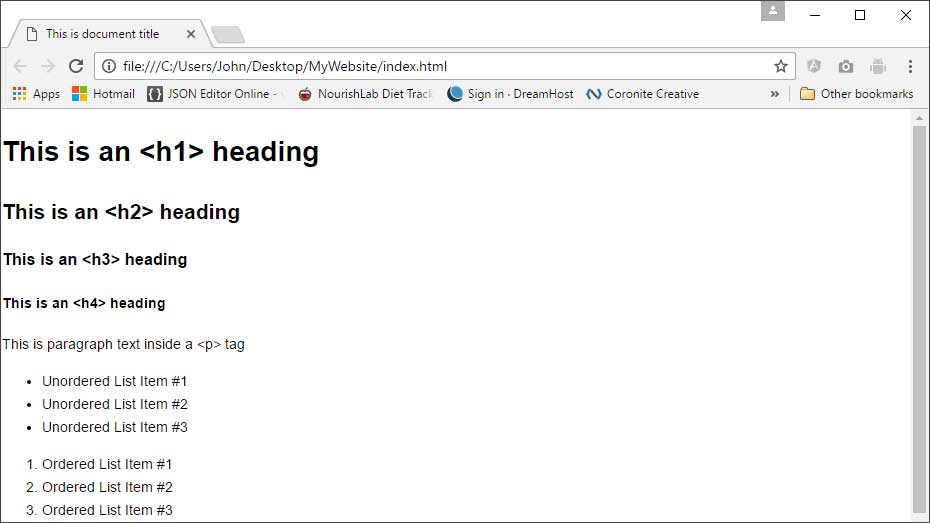
The above code produces the following output when opened by a browser:
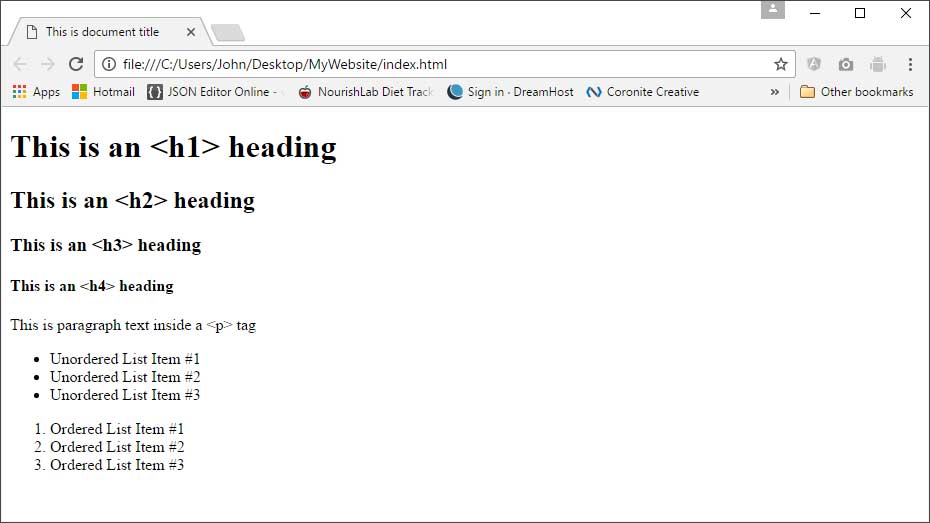
Click Here to see the above HTML
code in a browser, or better yet, open your index.html file in a browser.
Notice in the above code as well, that the < and > signs are represented with
< and > on lines 7-11. These are called Entity
Codes and are used to tell the browser that we want to display brackets to the viewer. If we
used the < and > symbols in our code, the browser would think we were
trying to create tags. There are a lot of characters that can be produced with Entity Codes, from
mathematical symbols to characters for different languages - See HTML Entity Codes or the
link in the Resources section in the sidebar for a complete list.
Quiz # 2 - HTML
One of the best ways to familiarize yourself with HTML (or any programming language) is to look at the online documentation. It's impossible to remember all of the tools you have available to you, so having the documentation handy can help.
Here is a link to the documentation for HTML Elements. It lists all of the Elements you can create in HTML documents, and shows which tags to use to create them. One of the most common elements in HTML is called an anchor. Anchors let you create links to other pages, or different sections on the same page. Study the documentation for HTML Elements. What is the tag (i.e., the opening tag) you would use to create an anchor element in HTML?
6. Images and Links
The <img> tag lets us display an image on the page, and is constructed as shown in
the image below:
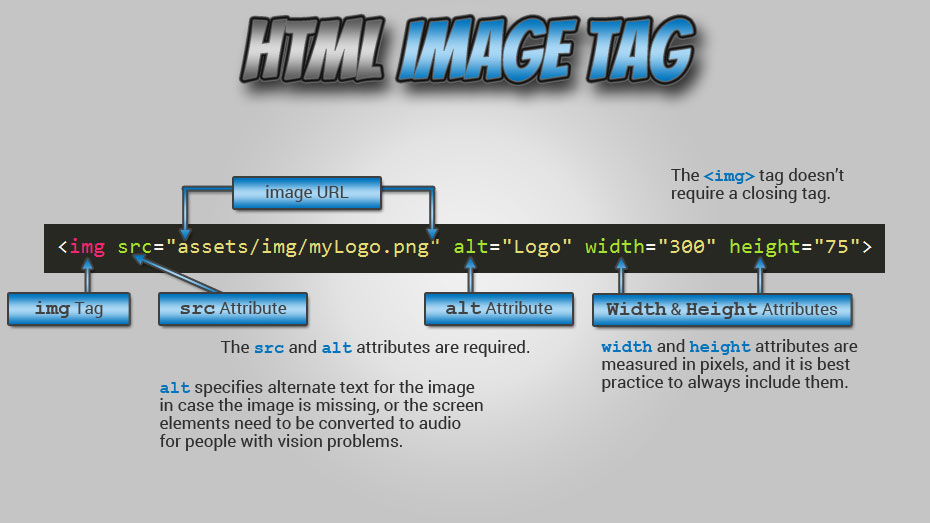
<img> tagNote that the image tag doesn't require a closing tag and it contains the Attributes
src, alt, width, and height.
And here is an image tag in code that can be copied. Be sure to change the tag's Attributes to suit the image you want to display.
<img src="assets/img/myLogo.png" alt="Logo" width="300"
                  height="75">
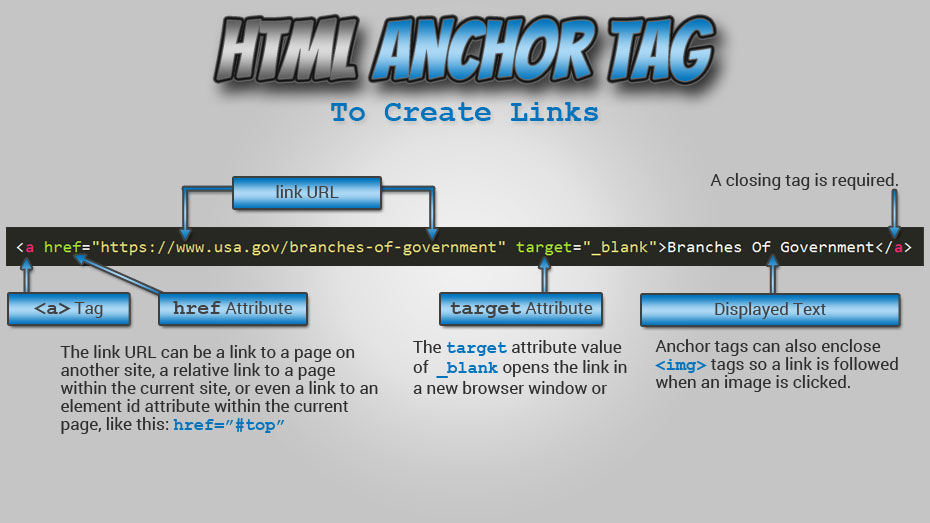
The anchor, or <a> tag lets us create links to pages on other websites, different
pages on the current website, or even elements on the same web page. The image below shows how the
<a> tag is constructed:
<a> tag7. Chrome Developer Tools
Before we get started on CSS, let's look at the Developer Tools that come with the Google Chrome Browser. When viewing a webpage you want to inspect in Chrome, press Ctrl + Shift + I (Cmd + Opt + I on Mac) or Right Click an Element with the mouse and select Inspect.
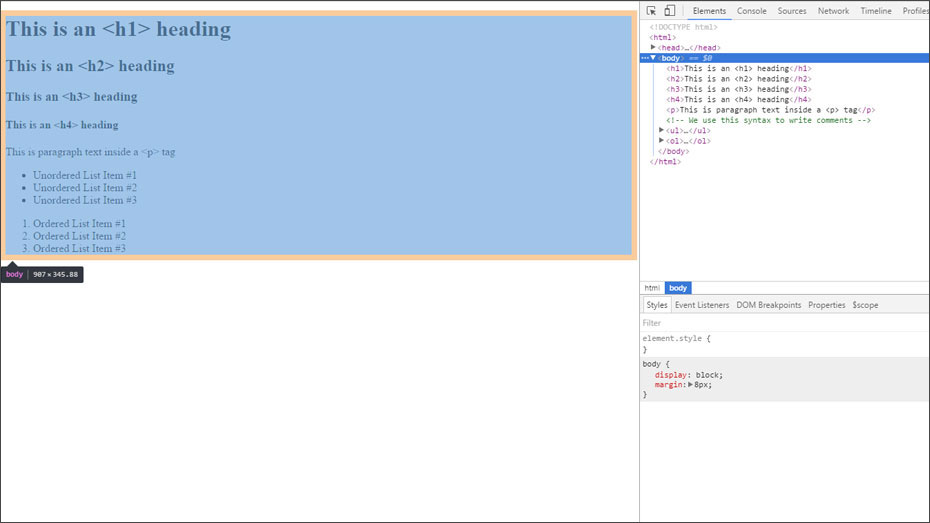
The Elements Tab of the Chrome DevTools lets you view the browser output as well as the HTML and CSS files. When you mouse over the element in the HTML code, the corresponding browser output is highlighted (like above). You can also click on the check boxes that appear when you mouse over CSS declarations to experiment with toggling CSS declarations on and off. Note: the few CSS declarations we see in our page now are the browser defaults - we'll add CSS to our page soon.
If you click your cursor on a CSS property or value, you can change it (Chrome DevTools even gives you a full color picker to select colors). And one of the nice features of Chrome DevTools is that it can help to auto-complete property names and values so you know all of the ones available to you.
Remember that all the changes you make with Chrome DevTools are only temporary until the browser refreshes. Chrome DevTools doesn't alter your sourcecode. If you make a change you want to keep, you can cut and paste the code from Chrome DevTools into your sourcecode.
8. CSS
We now know how to create elements with HTML, and we know how to render HTML documents in a browser. But the HTML-only file we saw above doesn't look so great. There's no color, there's only one font, and all of the content is aligned on the browser's left edge. What we're looking at are the browser's default stylings.
So, how do we add color to our websites? How do we style the layout so it's easy to navigate, and how to we style the text so that it's easy to read? The answer to all of these questions is: CSS.
Websites are styled with a stylesheet language called CSS (Cascading Style Sheets).
If HTML files tell the browser what "stuff" to show, CSS files tell the browser how that stuff should look.
There are three ways to add CSS to our HTML. Most commonly, CSS files are linked to in the <head>
tag on our HTML file with a <link>tag that could look something like this:
<link rel="stylesheet" type="text/css" href="assets/css/main.css">
We can also add CSS declarations directly to the tags of the elements we want to style, but this is
rarely done unless there is a good reason to do so (we'll cover some reasons later in the course). For
example, adding an inline style to the <body> tag could look like:
<body style="margin:40px">
Let's start by adding to our index.html file. Below (on line 4), we've added a <base>
tag, which tells the browser the location of our site root. Because the site root will be different on every computer, we made it so the code will work wherever your root directory (i.e., folder) happens to be. In the <base> tag, we prepended the root directory with ../ to move up one level and point to the parent directory.
For example, since index.html is in the MyWebsite directory, <base
href="../MyWebsite/"/>, when in index.html, points to the directory which
contains the MyWebsite directory (whatever that happens to be on your
computer).
We also added a <link> to our stylesheet (on line 7):
ACTION STEP 8: Add the <base> and stylesheet
<link> tags into your index.html file:
File: index.html
<!DOCTYPE html>
<html>
<head>
<base
                    href="../MyWebsite/"/>
<!-- For the base tag, we can also use the full file path e.g,:
<base href="file:///C:/Users/John/Desktop//MyWebsite/"/> -->
<link rel="stylesheet" type="text/css" href="assets/css/main.css">
<title>This is document title</title>
</head>
<body>
<h1>This is an <h1> heading</h1>
<h2>This is an <h2> heading</h2>
<h3>This is an <h3> heading</h3>
<h4>This is an <h4> heading</h4>
<p>This is paragraph text inside a <p> tag</p>
<!-- We use this syntax to write comments -->
<ul>
<li>Unordered List Item #1</li>
<li>Unordered List Item #2</li>
<li>Unordered List Item #3</li>
</ul>
<ol>
<li>Ordered List Item #1</li>
<li>Ordered List Item #2</li>
<li>Ordered List Item #3</li>
</ol>
</body>
</html>
index.html with a <base> tag and a
link to the stylesheet.
Now that we have our stylesheet referenced, let's add the following to our main.css
file:
ACTION STEP 9: Add the CSS code below into your main.css file:
File: main.css
                                body {
                                  font-family: 'Open Sans', sans-serif;
                                  font-size: .875em;
                                  color: #000000;
                                  font-weight: normal;
                                  line-height: 1.7;
                                }
In a browser, the above code now looks like the image below
index.html with CSS Applied to the
<body> element
Notice that the font style has changed from the browser's default style to a sans-serif font. The font size is also a little bit smaller.
Let's take a look at how CSS is structured:
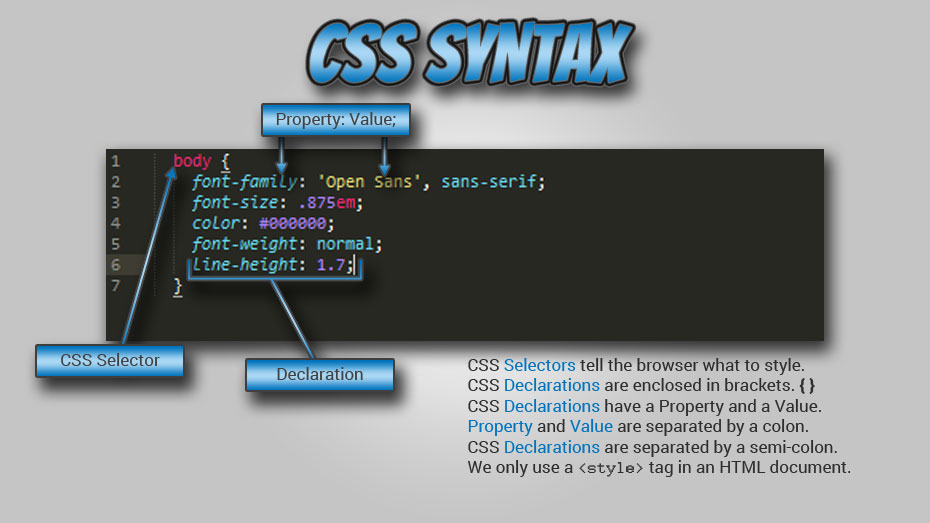
The font-family: property sets the font used for
text. We can give the browser a comma-separated list of several fonts to choose from. The browser uses
the first font it has available from the list.
The font-size: property tells the browser at what
size to display the text. We used a value of: .875em for this. 1em is equal
to the current font size (which in our case is the browser default of 16px. The font size of the text in our <body>
tag, therefore, will be 14px by default.
Why didn't we just set the font-size value to
14px (which is also a valid property value)? Using
em means that if our user resized the default size of the text
display in their browser (as users with poor eyesight often do) the text size they see will be 87.5%
of the text size they selected instead of 14px.
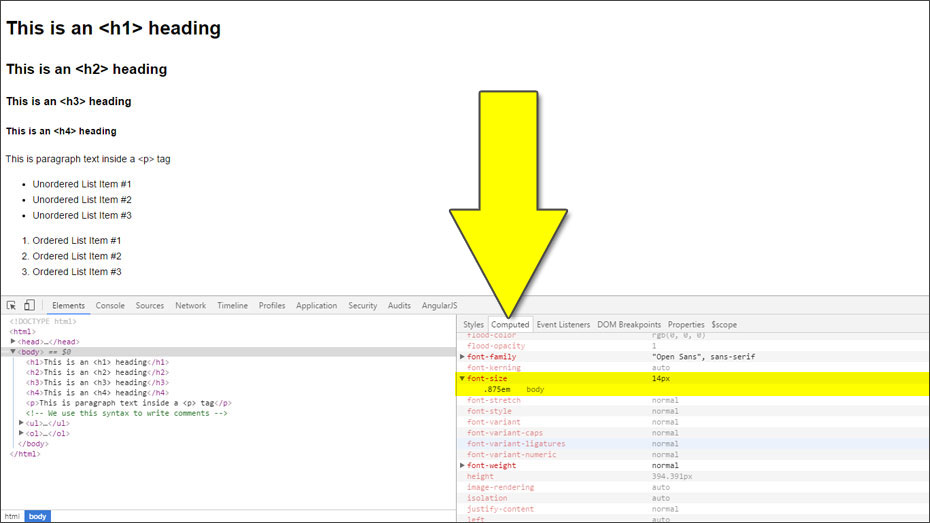
If we want to see the computed value for relative sizes or other CSS properties, we can do so using Chrome
DevTools. First we select the element in the HTML, then we select the Computed tab. We scroll
down to the font-size property and we can see that
it is 14px. We can also see where in our CSS file
the property is defined.
The font-weight: property tells the browser how
bold to make the text. Not all values are available for each font, but generally a value of 600 (or bold) will create a bold font.
The color: property sets the color of the text. Use
Chrome
DevTools to experiment with various HEX
Values: for the text color.
Why Is CSS Called "Cascading" Style Sheets?
CSS is called "cascading" stylesheets because it appplies rules to elements AND all of the "child"
elements within them. For example, if we declare a font for our <body> tag, this
font will be used for every font on the page (every element within the body tag) unless we tell CSS to
do otherwise.
Similarly, if we declare styles for our <button> tag, all of the buttons on the
page will have this style applied to them.
But, what if we DON'T WANT all of our buttons to look the same?
If an element is unique (i.e., there is just ONE of them), we can add an id attribute to
its HTML tag.
If an element is NOT unique (i.e., there is MORE THAN ONE of them), we can add a class
attribute to its HTML tag. Then, we can use the class attribute in our CSS to style all of the
elements of this class.
class and id attributes can be named anything we like, but they cannot start
with a number.

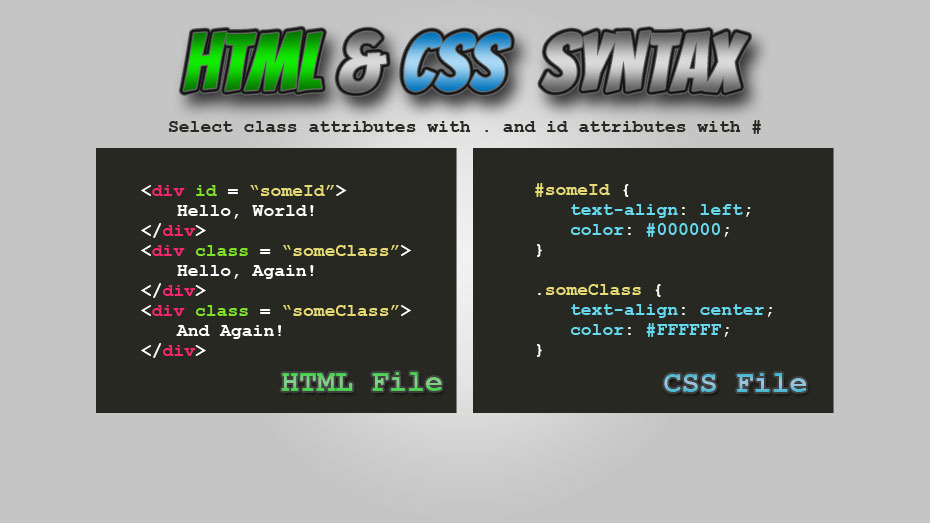
CSS declarations reference the id attribute with # followed by the id
attribute name.
CSS declarations reference class attributes with . followed by the class
attribute name.
Take, for example, the following 3 buttons:
Which are produced with the following HTML code:
HTML
                              <span>
                                <button>Button 1</button>
                              </span>
                              <span>
                                <button>Button 2</button>
                              </span>
                              <span>
                                <button>Button 3</button>
                              </span>
What if we want the first two buttons styled one way, and the third button styled differently? If we
styled the button tag in our CSS, the style would be displayed for
every button on our website and every button would look the same.
To style only some elements of a given type, we add a class attribute, so our code could look like this:
HTML
                              <span>
                                <button class="red-button">Button 1</button>
                              </span>
                              <span>
                                <button class="red-button">Button 2</button>
                              </span>
                              <span>
                                <button>Button 3</button>
                              </span>
Then, we can use this class in our CSS like this:
CSS
                            .red-button {
                              background-color: #8B0000;
                              color: #FFFFFF;
                            }
Then, we can add either a class or id attribute to the third button:
HTML
                              <span>
                                <button class="red-button">Button 1</button>
                              </span>
                              <span>
                                <button class="red-button">Button 2</button>
                              </span>
                              <span>
                                <button class="green-button">Button 3</button>
                              </span>
And add the styling for the third button to the CSS:
CSS
                            .red-button {
                              background-color: #8B0000;
                              color: #FFFFFF;
                            }
                            .green-button {
                              background-color: #006400;
                              color: #FFFFFF;
                            }
Which produces the following output:
Quiz 3 - CSS
What is the color HEX Value for the color below?
Quiz 4 - CSS
The buttons on this page (like the Submit button below) have rounded edges. Inspect one of them with Google Chrome's Dev Tools and find which CSS Property rounds the edges of buttons and other elements.
Quiz 5 - CSS
Say we have four buttons that are coded in HTML like this:

What CSS selector would we use if we just wanted to style ONLY the THIRD ONE of them?
Note: Above, we see that elements can have more than one class applied to them.